

Building your first base in Palworld is one of the biggest decisions you'll make in the early hours. A good location keeps your production running smoothly for dozens of hours, while a poor choice usually means rebuilding everything once better resources open up nearby.
The best base isn't always the one sitting on the most ore or the flattest ground. Some spots are built for farming resources, others make more sense for breeding, and a few are just worth living in because of the view.
This guide rounds up the strongest base locations across Palworld's 1.0 update, organized by progression stage instead of a single "best" pick. Whether you want an easy early mining outpost, a late-game Hexolite farm, or a quiet island for fishing, there's something here to match your playstyle.
Instead of picking one location and sticking with it for the whole run, treat these as a toolkit. Match the base to what you're trying to accomplish right now, and you'll spend a lot less time backtracking to rebuild later.
In This Guide
Best Palworld Base Locations at a Glance
| Base Location | Best For | Stage |
|---|---|---|
| North of Chillet | Early ore farming | Early Game |
| West of Rayne Syndicate Tower | Balanced starter base | Early Game |
| Golden Hills | Ore and expansion | Early Game |
| Penking Coast | Vertical beachfront build | Mid Game |
| Crescent Moon Shore | Multi-resource production | Mid Game |
| World Tree Overlook | Scenic main base | Mid/Late Game |
| Sunlit Isle | Fishing and Oil | Late Game |
| Quartz & Sulfur Plateau | Resource farming | Late Game |
| Triple Oil Field | Oil production | Late Game |
| Desert Plateau | General-purpose base | Late Game |
| Mushroom Valley | Defensive breeding base | Late Game |
| Sakurajima Plateau | Oil and expansion | Late Game |
| Feybreak Hexolite Base | Hexolite farming | End Game |
| Soralite Plateau | Soralite farming | End Game |
Best Early Game Base Locations
During the opening hours of Palworld, your priorities are simple: gather ore, automate basic production, and leave yourself enough room to expand. These locations give you solid access to early resources without dragging you into dangerous late-game regions before you're ready.
1. North of Chillet
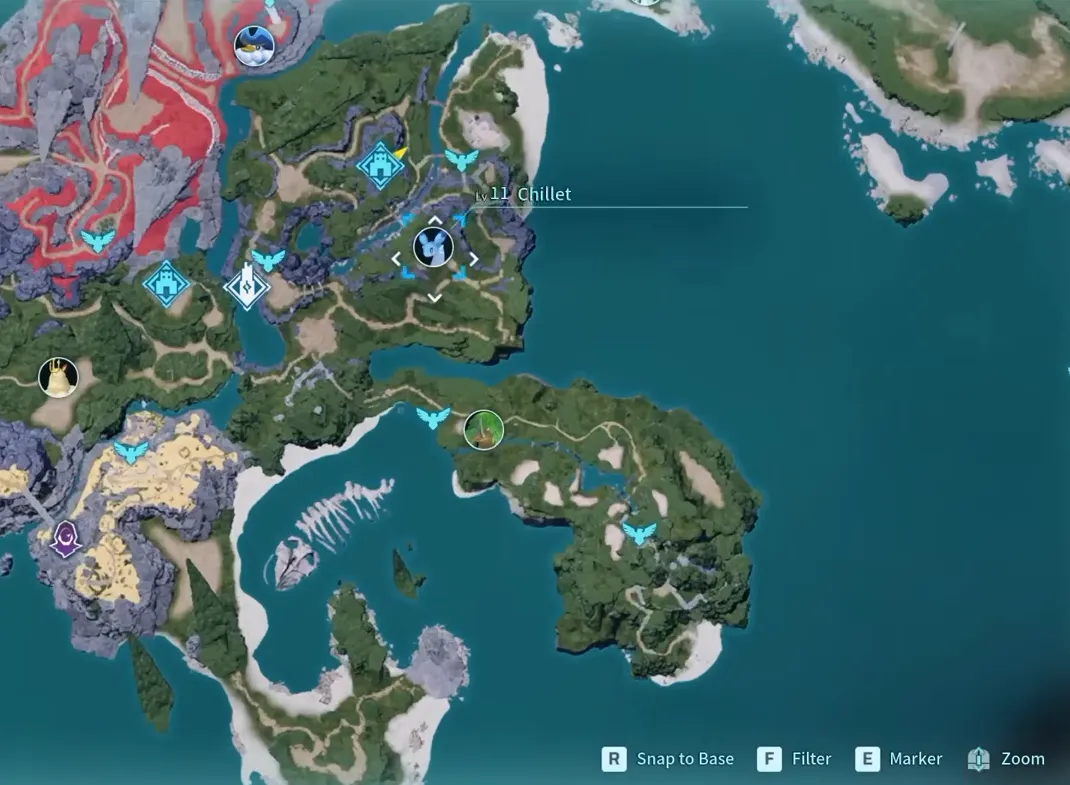
Best for: Ore farming and a secure first base
Just north of the Chillet area, beyond the bridge leading into the plateau, sits one of the better early-game spots in the game. Skipping the crowded Hill of Beginnings for this elevated ground gets you a far more defensible position without giving up easy access to early resources. That bridge matters more than it looks: it funnels raiders into a single narrow approach instead of letting them surround your base from every side.
There are several ore deposits close by, so it doubles as a solid first mining base. You'll want Pals with higher mining levels to really dig into the area later, but even without them it's a dependable foundation to build on early.
The surrounding landscape is worth settling into as well. Nearby dungeons and an offshore oil platform give you somewhere to head once you're ready to explore farther out.
Why build here?
- Natural bridge creates an easy defensive choke point
- Good access to early ore deposits
- Close to nearby dungeons for exploration
- Plenty of room to expand as your production grows
- Solid long-term starter base before you move into specialized resource farms
2. West of the Rayne Syndicate Tower
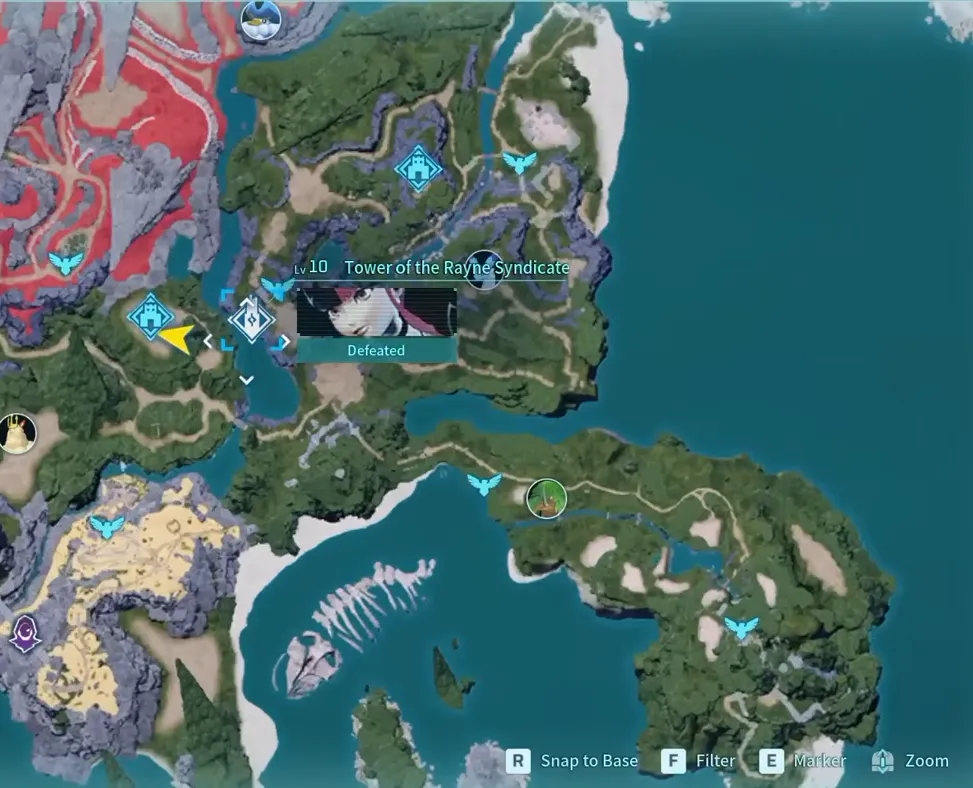
Best for: A balanced beginner base
If you want a straightforward starter location, the open plateau west of the Rayne Syndicate Tower is one of the easiest places to get a functional base running.
Large patches of flat terrain cut down the prep work before construction, while nearby ore, stone, and trees cover nearly every material you need during the early stages of the game. The surrounding cliffs also naturally restrict enemy approaches, which makes it easier to position defensive structures once raids start picking up.
It's also just convenient. Important landmarks stay within sight, so it's easy to move between your base, nearby fast travel points, and early exploration routes without wandering too far from home.
Why build here?
- Large flat building area
- Nearby ore, stone, and wood
- Easy expansion space
- Natural terrain offers defensive advantages
- Convenient location for early exploration
3. Golden Hills
Coordinates: (11, -525)
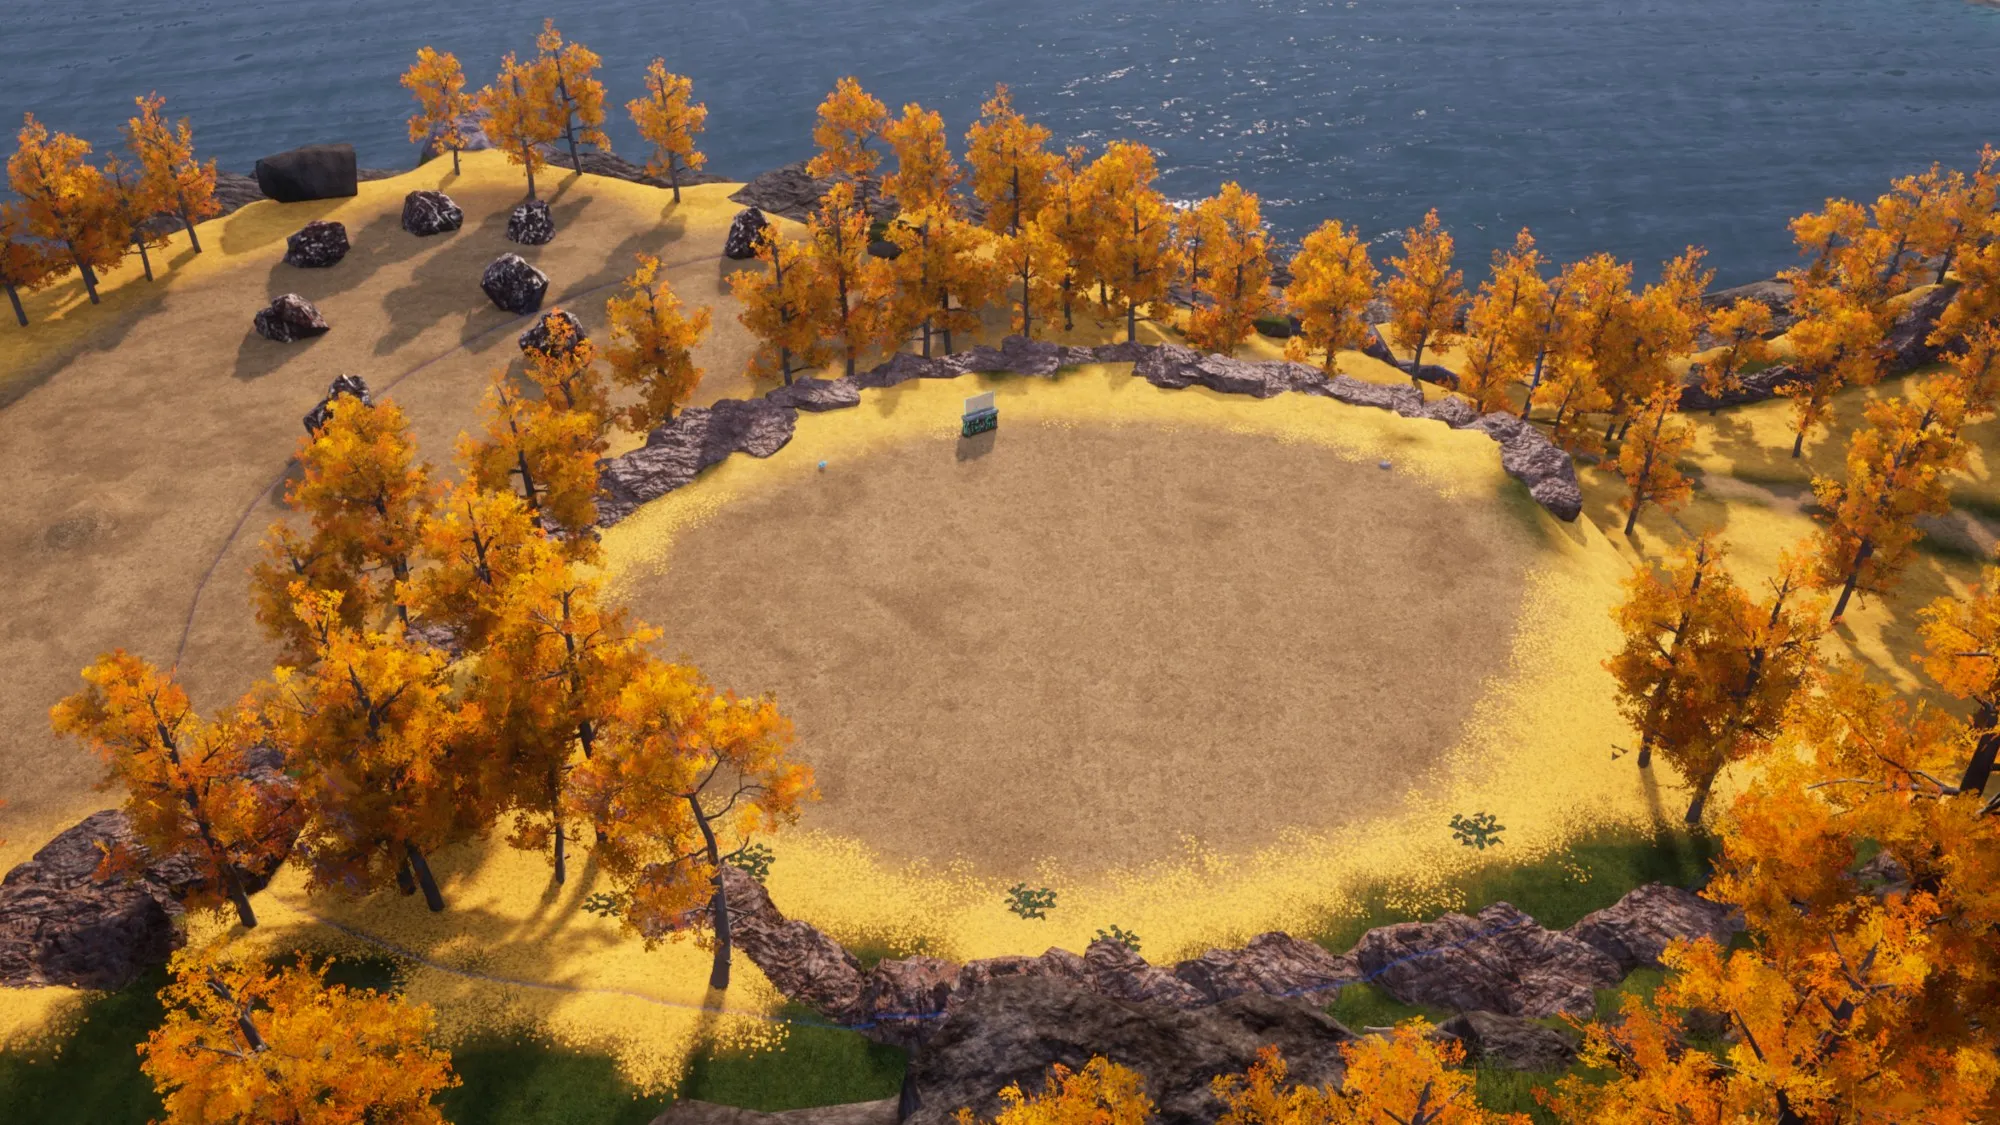
Best for: Resource gathering and early expansion
Golden Hills is one of the richest early-game resource locations in Palworld. Multiple ore deposits, abundant stone, trees, and nearby expedition points make it a strong choice if you want to automate production as quickly as possible.
Unlike some of the more compact starter spots, this area gives you enough space to grow alongside your base without feeling cramped. As your production chains get more complex, that extra room makes it easier to keep crafting stations, Pal work areas, and storage separated.
The nearby watchtower also works as a recognizable landmark while you're exploring the surrounding region.
It doesn't have the dramatic scenery of some later locations, but Golden Hills hits a good balance of accessibility, resources, and room to grow, which makes it a strong pick if you'd rather build one long-term headquarters than relocate every few hours.
Why build here?
- Rich concentration of ore
- Stone and trees nearby
- Close to multiple expedition locations
- Large buildable area
- Suitable as a long-term early-game headquarters
Next, we'll move past the starting islands and into the best mid-game base locations, including the Penking coastline, Crescent Moon Shore, and one of the most scenic overlooks in the game, with a view of the World Tree that's surprisingly practical for a permanent home.
Best Mid-Game Base Locations
By the time you reach the mid-game, your priorities start to shift. Instead of just gathering ore and wood, you'll want bases that offer better production potential, more room to expand, and access to resources that support advanced crafting.
These locations strike a balance between practicality and long-term usefulness, which makes them good candidates for a permanent headquarters.
4. Penking Coast
Coordinates: (108, -328)
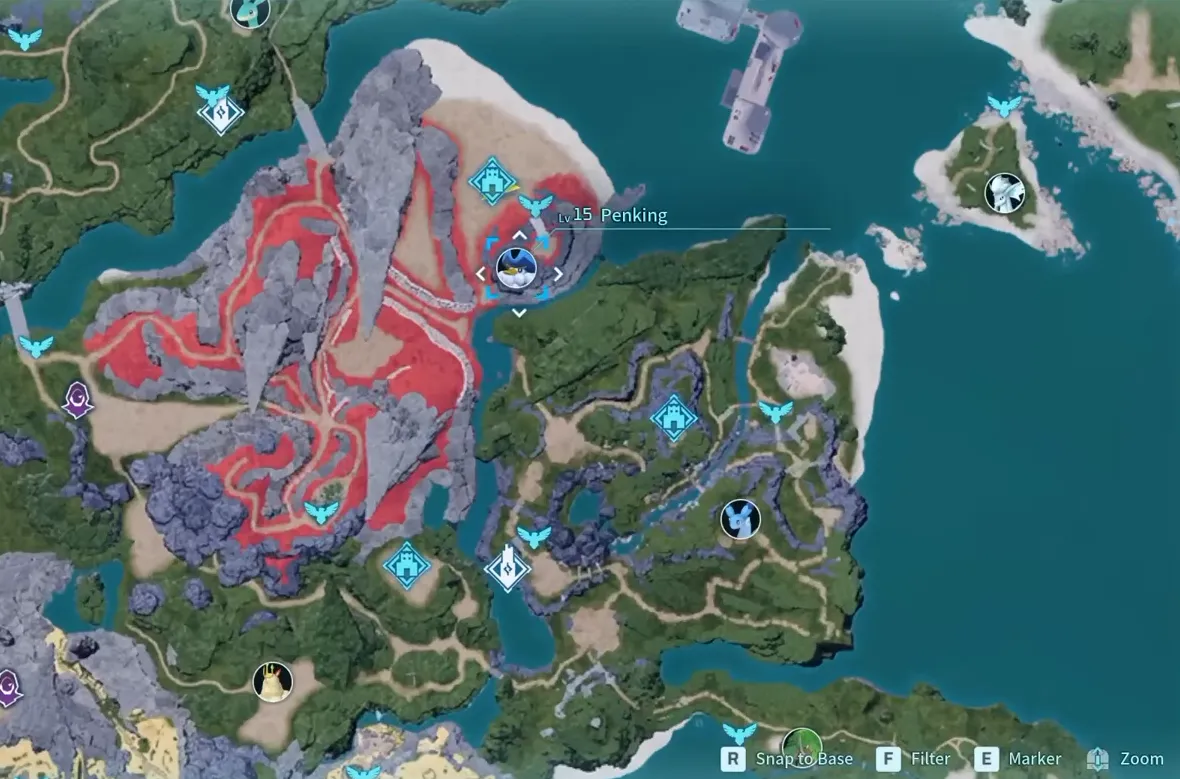
Best for: Vertical building and a scenic coastal headquarters
Located just north of the Penking boss area, this coastal plateau is one of the more distinctive building spots in Palworld. Instead of a wide open field, the surrounding cliffs push you toward vertical construction, which suits players who like designing multi-story bases.
Pal pathfinding improvements in the 1.0 update make stair-based tower designs much more practical than they used to be, so workers move between floors more reliably than in older versions.
Beyond the build potential, the location also has an open coastline, nearby forests, and an offshore oil platform visible from shore. Even if you don't start extracting oil right away, it's a useful landmark as you keep progressing.
The mix of scenery and flexibility makes this one of the better picks if you want your main base to look impressive without giving up functionality.
Why build here?
- Large vertical building space
- Excellent coastal scenery
- Nearby forests for wood collection
- Offshore oil platform nearby
- Improved stair navigation makes tower designs more practical
5. Crescent Moon Shore
Coordinates: (-72, -325)
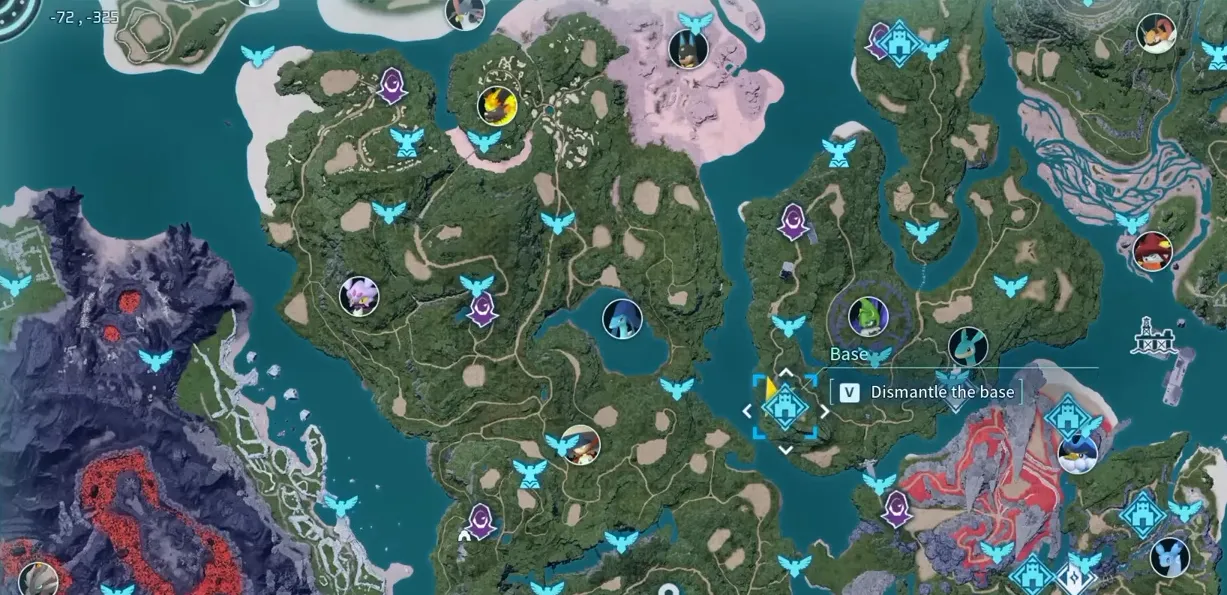
Best for: Mid-game production and resource gathering
Crescent Moon Shore is one of the more well-rounded locations on this list. It combines generous building space with access to several key resources, which makes it a solid upgrade once your starter base starts feeling cramped.
Stone, ore, Palladium, trees, and additional resource nodes are all scattered through the surrounding area, so a single base here can support multiple production chains without constant back-and-forth travel.
The open terrain also lends itself to bigger layouts, whether you're going for a sprawling factory-style build or something taller and more vertical.
It sits a bit farther from the beginner regions, but the extra resources make relocating here worthwhile once you're preparing for the later stages of the game.
Why build here?
- Strong mix of mid-game resources
- Plenty of flat building space
- Nearby ore and Palladium
- Easy to expand as production increases
- Suitable for a long-term headquarters
6. Sunlit Isle Fishing Base
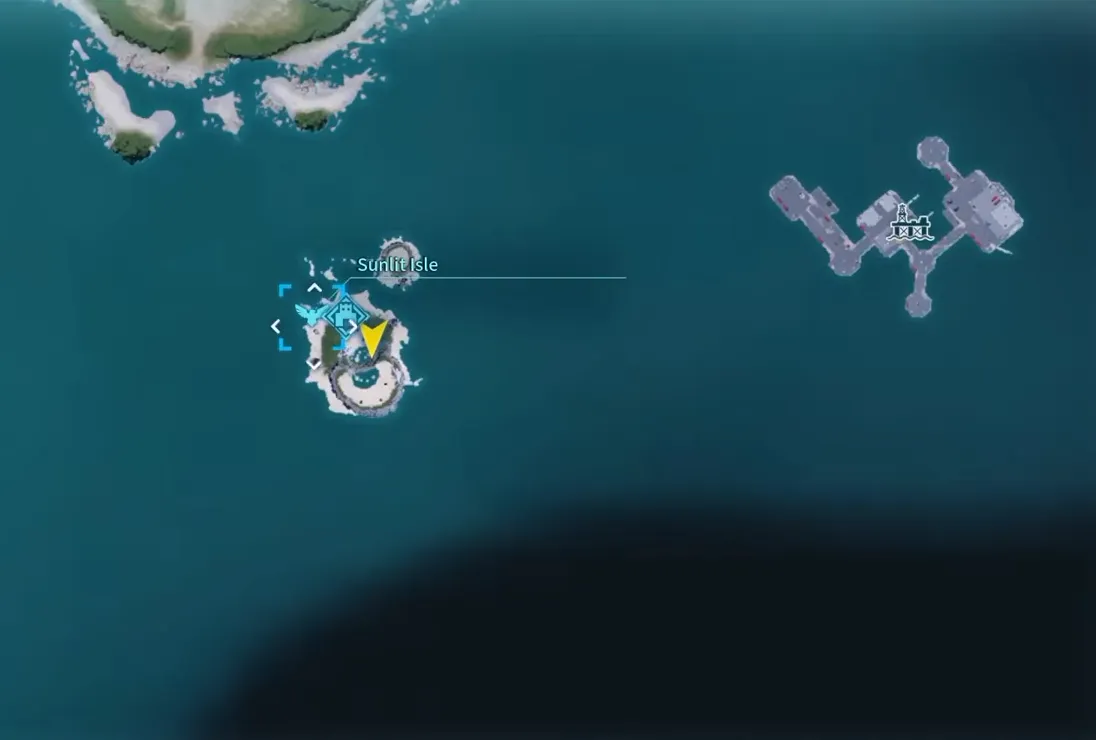
Best for: Fishing, oil production, and island living
If you've been looking for an excuse to build an island fortress, Sunlit Isle is one of the best opportunities in Palworld.
Instead of focusing on mining, this location works as a dedicated fishing base while also giving you access to three nearby oil nodes behind the island. There are multiple suitable building sites here, so you can prioritize either oil production or proximity to the surrounding fishing waters depending on what you need.
The surrounding ocean is full of fish, which makes the island a good pick if you want to automate fishing while keeping a productive settlement running.
Its isolated location also creates a quieter atmosphere than the busier mainland regions.
Why build here?
- Excellent fishing opportunities
- Three nearby oil nodes
- Spacious island for castle-style builds
- Peaceful location away from crowded mainland areas
- Strong option for specialized resource production
7. World Tree Overlook

Coordinates: (4, -87)
Best for: A permanent scenic home
Not every base needs to maximize resource production. Sometimes the best location is simply the one you'll enjoy coming back to after every expedition.
Perched on a hill overlooking the World Tree, snowy mountains, surrounding islands, and the nearby coastline, this spot stands out mostly for the view. It isn't the most resource-rich area on this list, but the elevated position and single natural approach make it a favorite for long-term builds.
A nearby Skill Fruit Tree adds a small practical bonus, and the open space around it leaves plenty of room for creative construction.
Once your automated production is handling most of your resource needs, this is a good place to build the headquarters you'll probably keep visiting for the rest of your playthrough.
Why build here?
- Incredible panoramic views
- Nearby Skill Fruit Tree
- Easy raid approach from a single hillside
- Ideal for decorative or roleplay builds
- Plenty of room for large custom structures
Mid-Game Base Recommendations
At this point your base should start specializing instead of trying to do everything. Here's a simple progression path:
| If you need... | Recommended Base |
|---|---|
| More production | Crescent Moon Shore |
| A scenic headquarters | World Tree Overlook |
| Fishing and future oil production | Sunlit Isle |
| A unique vertical build | Penking Coast |
Instead of replacing every previous base, consider keeping your early-game mining outpost active while you expand into one of these larger locations. That way your original base keeps producing basic materials while your new headquarters handles more advanced crafting and automation.
Next, we'll cover the locations players usually build entire production chains around, including the best spots to farm Oil, Quartz, Sulfur, Hexolite, and Soralite, along with several late-game locations that work well as specialized resource hubs.
Best Late-Game Resource Base Locations
Once you reach Palworld's later stages, raw production matters a lot more than simply having a large base. By this point you'll likely have several settlements dedicated to different tasks, whether that's refining oil, farming rare minerals, breeding Pals, or gearing up for endgame crafting. These locations specialize in exactly that.
8. Quartz & Sulfur Plateau
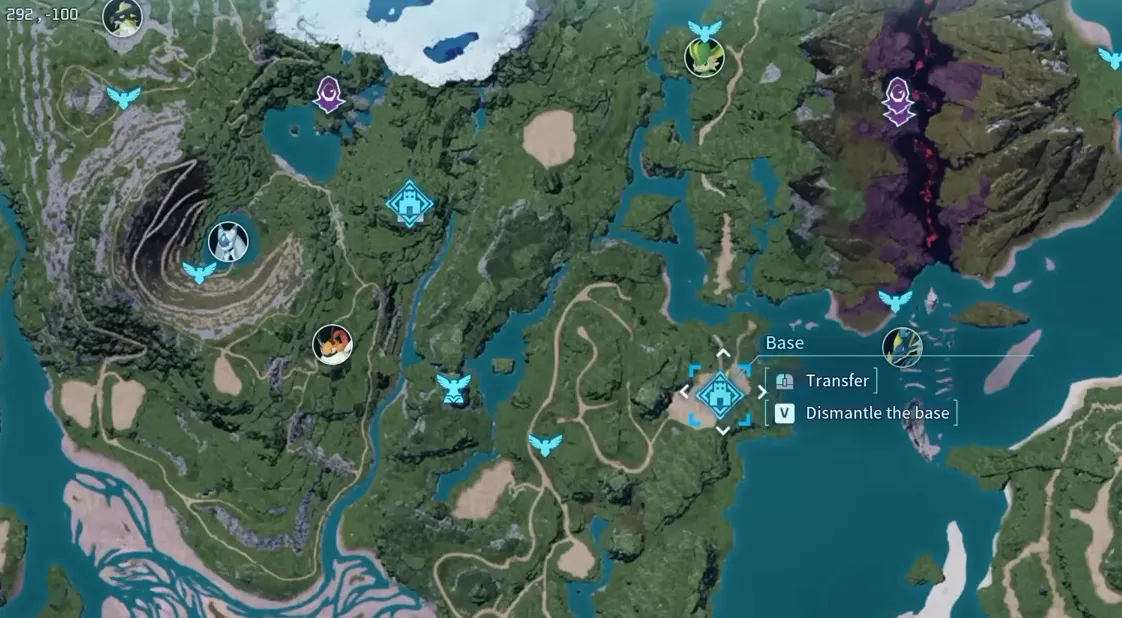
Coordinates: (4, -87)
Best for: Quartz, Sulfur, and advanced crafting
If your production line has hit the point where advanced crafting materials are the bottleneck, this plateau west of Yormuntide is one of the better places to set up a dedicated mining operation.
The area holds an unusually dense concentration of Quartz and Sulfur alongside additional ore deposits, so you can pull several important resources from a single base.
The surrounding rocky spires also leave plenty of room for expansion and give the area a look that's different from Palworld's flatter regions.
This works better as a specialized mining outpost feeding resources back to your main production base than as a permanent headquarters.
Why build here?
- Large concentration of Quartz
- Excellent Sulfur production
- Additional ore nearby
- Spacious terrain for mining operations
- One of the stronger late-game resource bases
9. Triple Oil Base
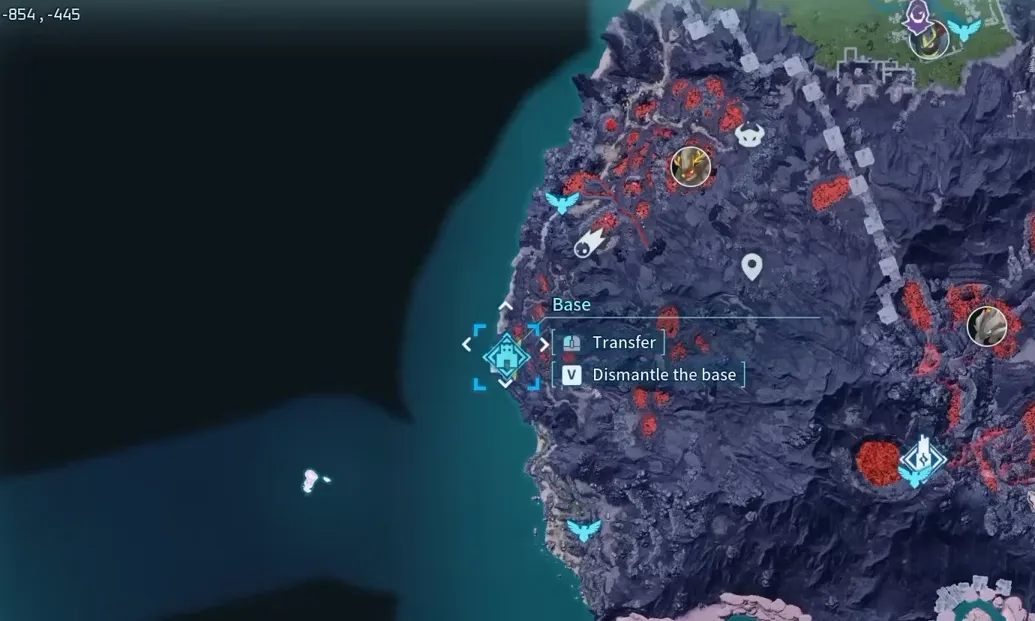
Coordinates: (-854, -445)
Best for: Oil production
Oil quickly becomes one of the most valuable resources in the later stages of Palworld, which makes dedicated extraction bases almost essential.
This location stands out because three oil nodes sit close enough together to work from a single base, which dramatically increases production compared to smaller deposits. There's nearby ore and local Pal spawns too, so it's useful beyond just oil.
The terrain isn't particularly scenic, but efficiency is the real priority here.
If your factories keep running short on oil, this should be one of your higher-priority expansions.
Why build here?
- Three oil nodes
- Nearby ore deposits
- Excellent late-game production
- Ideal as a dedicated industrial base
10. Desert Plateau
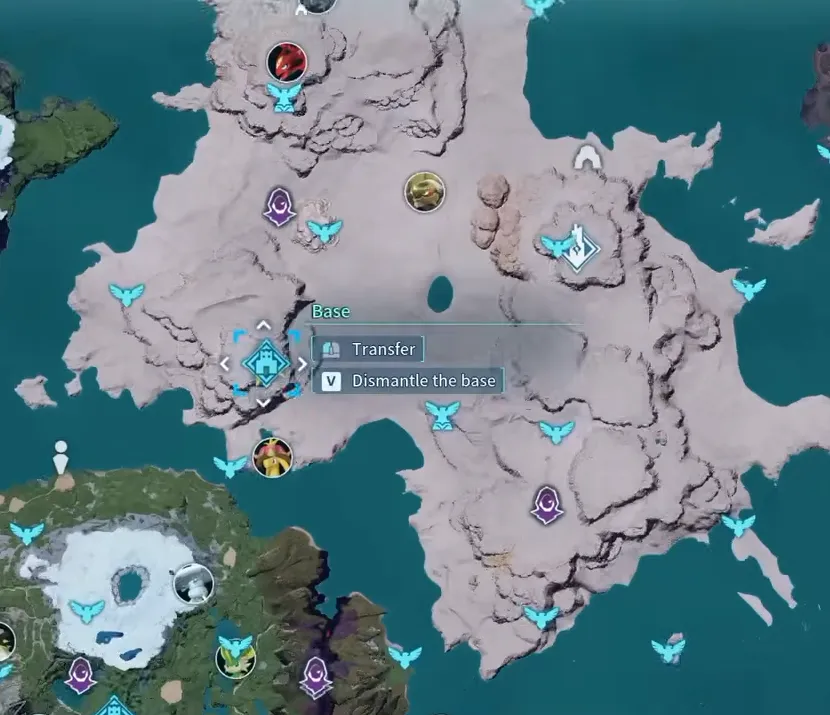
Coordinates: (-307, -244)
Best for: A general-purpose late-game headquarters
Not every late-game base needs to specialize. The elevated plateaus across the desert give you plenty of open building space while staying relatively central to several important regions.
Nearby trees, stone, and access to oil depending on placement make the plateau a flexible spot that can support almost any production chain.
If you'd rather run most operations out of one massive headquarters, this is one of the better places to do it.
Why build here?
- Huge construction area
- Flexible layout
- Central location
- Nearby resources
- Suitable for almost any production chain
11. Mushroom Valley
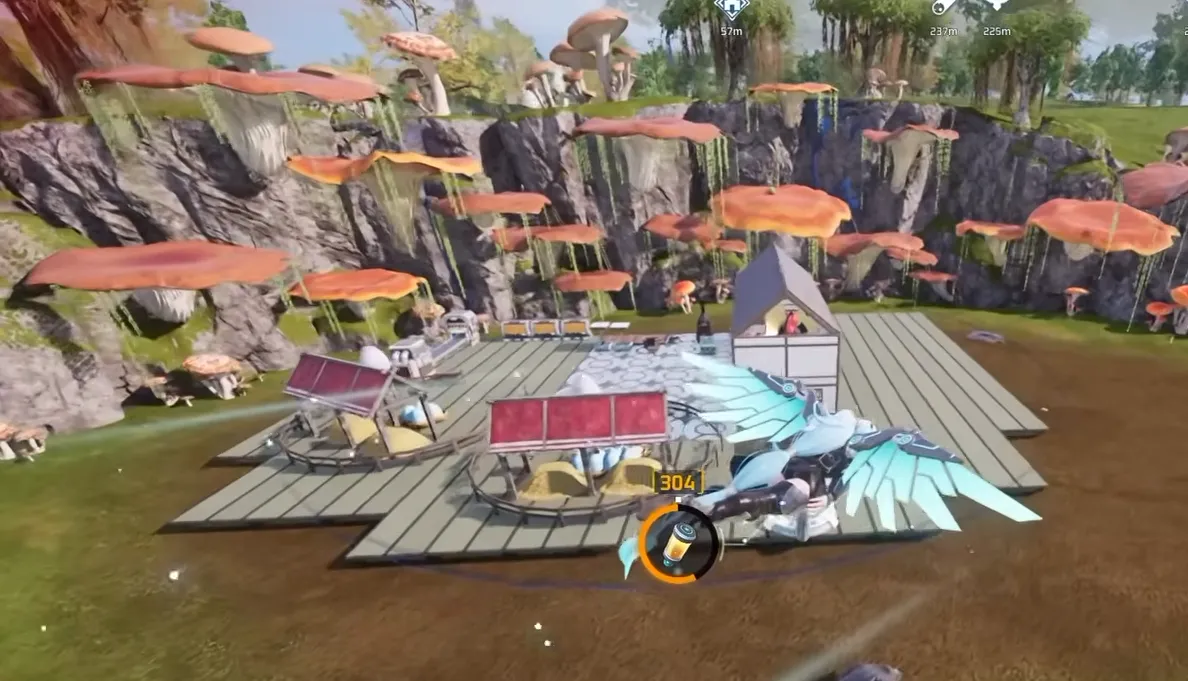
Coordinates: (-512, 160)
Best for: Defensive builds and Breeding
This is one of the more visually distinctive locations in Palworld, thanks to its towering mushrooms and narrow valley entrance.
Its real strength isn't resources, though. It's defense. Enemies get funneled through a single approach here, which makes raids much easier to manage than in wide-open areas.
Combined with its quiet atmosphere, Mushroom Valley works well for breeding farms, hatcheries, or anyone who just likes building in unusual environments.
Why build here?
- Naturally defensive terrain
- Unique scenery
- Great for breeding facilities
- Easy raid management
12. Sakurajima Plateau
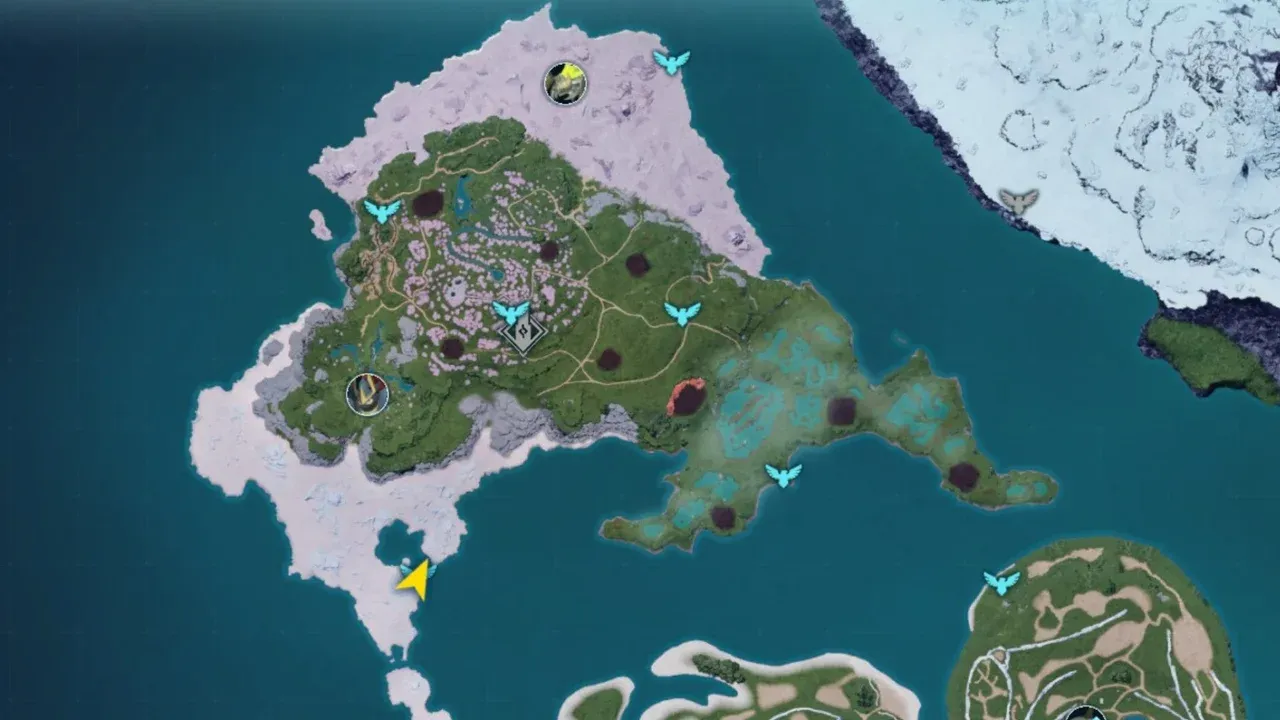
Best for: Oil production and expansion
High above Sakurajima sits another strong late-game construction site.
The area combines generous building space with access to oil and additional resources, while offering an even better, closer view of the World Tree in the distance. The spacious terrain also lends itself well to larger, multi-level builds.
If you want a long-term headquarters that balances productivity with aesthetics, this location is worth serious consideration.
Why build here?
- Double Oil access
- Large buildable area
- Great scenery
- Strong all-purpose headquarters
13. Feybreak Hexolite Base
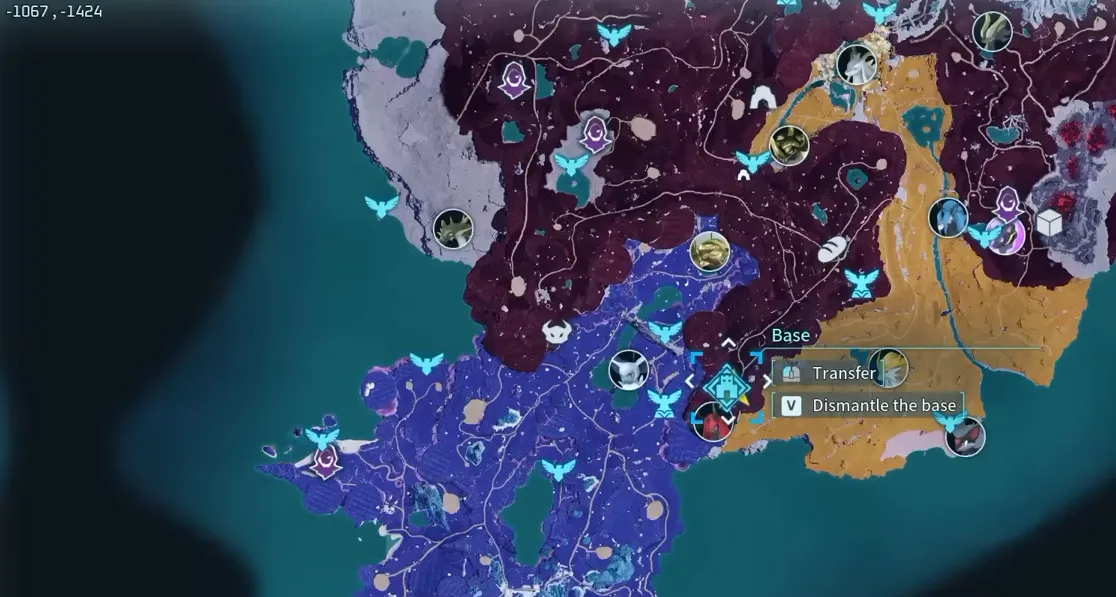
Coordinates: (-1067, -1424)
Best for: Hexolite farming
Once Hexolite becomes part of your crafting requirements, having a dedicated mining base for it saves a huge amount of time.
This Feybreak location has three nearby Hexolite nodes alongside additional stone and ore, making it one of the stronger resource hubs in this guide.
Its fairly isolated position also makes it better suited as a specialized late-game outpost rather than a base you're constantly occupying.
Why build here?
- Three Hexolite nodes
- Additional ore
- Excellent endgame mining
- Plenty of expansion space
14. Soralite Plateau
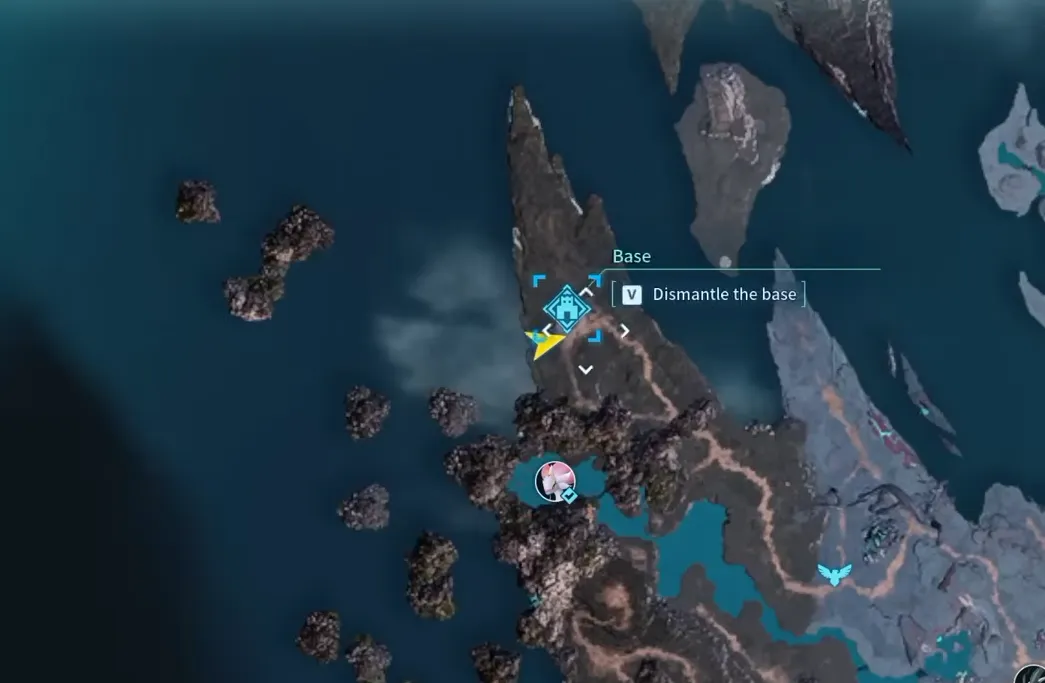
Coordinates: (-1067, -1424)
Best for: Soralite farming
Players gearing up for endgame equipment will eventually need Soralite, and this plateau has one of the densest concentrations you'll find.
Two nearby locations stand out here, one with five nodes and another with six, so you can choose between slightly higher production or the more scenic northern overlook. Harvesting Soralite requires the Plasma Multi-Cutter, and you'll need to strike weak points to break the deposits.
Either location works well as a dedicated mining base once you reach this stage of progression.
Why build here?
- Dense Soralite deposits
- Excellent endgame resource farming
- Large building area
- Beautiful late-game scenery
Which Base Should You Build?
Instead of searching for one perfect location, think about building a network of specialized bases.
| Goal | Recommended Base |
|---|---|
| First base | North of Chillet |
| Early mining | Golden Hills |
| Long-term headquarters | Crescent Moon Shore |
| Scenic home | World Tree Overlook |
| Fishing | Sunlit Isle |
| Oil | Triple Oil Base |
| Quartz & Sulfur | Quartz Plateau |
| Hexolite | Feybreak Isle |
| Soralite | Northern Plateau |
| Defensive breeding | Mushroom Valley |
Tips for Choosing a Base
Before placing your Palbox, keep these considerations in mind:
- Prioritize flat terrain if you plan on building large production facilities
- Save specialized resource locations for dedicated mining outposts rather than trying to squeeze every operation into one settlement
- Natural cliffs, bridges, and narrow paths make raids much easier to defend
- Think about how much room you'll need for future expansion, especially once breeding farms, assembly lines, and extra storage become part of your workflow
- Vertical building is far more practical than it used to be thanks to improved Pal pathfinding, which makes tower-style bases a real option for many locations
Frequently Asked Questions
What is the best early-game base location in Palworld?
The area north of Chillet is one of the strongest starting locations thanks to its nearby ore, defensible bridge approach, and room for future expansion.
Which base is best for Oil?
The Triple Oil Base and the islands around Sunlit Isle both give you access to three nearby oil nodes, making them excellent choices for dedicated extraction.
Where should I farm Quartz and Sulfur?
The plateau west of Yormuntide combines large Quartz deposits with Sulfur and ore, making it one of the stronger late-game mining locations in this guide.
Should I keep my first base?
Yes. Rather than replacing it completely, turn your starter base into a production outpost while you build additional specialized settlements elsewhere.
Is it better to have one large base or multiple smaller bases?
As your world progresses, multiple specialized bases generally work better. A central headquarters supported by dedicated Oil, mining, breeding, and fishing outposts gives you easier access to the resources you need most.
Final Thoughts
The best base location in Palworld ultimately depends on what you're trying to accomplish.
Early on, reliable access to ore and building materials matters more than spectacular scenery. Later, specialized settlements for Oil, Quartz, Hexolite, and Soralite can dramatically improve your production, while scenic spots like the World Tree Overlook or Sunlit Isle give you a rewarding place to build a permanent home.
Rather than chasing one perfect location, build a network of complementary bases that each serve a specific purpose. With the right mix of mining outposts, production hubs, and headquarters, you'll spend less time transporting resources and more time exploring everything Palworld has to offer.
New to Palworld? Be sure to check out our comprehensive Palworld 1.0 Beginner's Guide, which covers everything you need to get off to the best possible start before choosing the perfect place to build your first base.
Editor's Note
This guide is based on verified Palworld 1.0 mechanics available at the time of publication. While every effort has been made to ensure the information is accurate, Palworld is an actively updated game, and future patches may rebalance resource nodes, base building systems, or map layouts.
We regularly revisit and update our guides to reflect major game updates, balance changes, and newly discovered strategies. If you notice something that has changed since publication, feel free to let us know through our contact page so we can keep this guide as accurate and useful as possible for everyone.